Computer Abbreviation
A
ADSL - Asymmetric Digital Subscriber Line
AGP - Accelerated Graphics Port
ALI - Acer Labs, Incorporated
ALU - Arithmetic Logic Unit
AMD - Advanced Micro Devices
APC - American Power Conversion
ASCII - American Standard Code for Information Interchange
ASIC - Application Specific Integrated Circuit
ASPI - Advanced SCSI Programming Interface
AT - Advanced Technology
ATI - ATI Technologies Inc.
ATX - Advanced Technology Extended
B
BFG - BFG Technologies
BIOS - Basic Input Output System
BNC - Barrel Nut Connector
C
CAS - Column Address Signal
CD - Compact Disk
CDR - Compact Disk Recorder
CDRW - Compact Disk Re-Writer
CD-ROM - Compact Disk - Read Only Memory
CFM - Cubic Feet per Minute (ft�/min)
CMOS - Complementary Metal Oxide Semiconductor
CPU - Central Processing Unit
CTX - CTX Technology Corporation (Commited to Excellence)
D
DDR - Double Data Rate
DDR-SDRAM - Double Data Rate - Synchronous Dynamic Random Access Memory
DFI - DFI Inc. (Design for Innovation)
DIMM - Dual Inline Memory Module
DRAM - Dynamic Random Access Memory
DPI - Dots Per Inch
DSL - See ASDL
DVD - Digital Versatile Disc
DVD-RAM - Digital Versatile Disk - Random Access Memory
E
ECC - Error Correction Code
ECS - Elitegroup Computer Systems
EDO - Extended Data Out
EEPROM - Electrically Erasable Programmable Read-Only Memory
EPROM - Erasable Programmable Read-Only Memory
EVGA - EVGA Corporation
F
FC-PGA - Flip Chip Pin Grid Array
FDC - Floppy Disk Controller
FDD - Floppy Disk Drive
FPS - Frame Per Second
FPU - Floating Point Unit
FSAA - Full Screen Anti-Aliasing
FS - For Sale
FSB - Front Side Bus
G
GB - Gigabytes
GBps - Gigabytes per second or Gigabits per second
GDI - Graphical Device Interface
GHz - GigaHertz
H
HDD - Hard Disk Drive
HIS - Hightech Information System Limited
HP - Hewlett-Packard Development Company
HSF - Heatsink-Fan
I
IBM - International Business Machines Corporation
IC - Integrated Circuit
IDE - Integrated Drive Electronics
IFS- Item for Sale
IRQ - Interrupt Request
ISA - Industry Standard Architecture
ISO - International Standards Organization
J
JBL - JBL (Jame B. Lansing) Speakers
JVC - JVC Company of America
K
Kbps - Kilobits Per Second
KBps - KiloBytes per second
L
LAN - Local Area Network
LCD - Liquid Crystal Display
LDT - Lightning Data Transport
LED - Light Emitting Diode
M
MAC - Media Access Control
MB � MotherBoard or Megabyte
MBps - Megabytes Per Second
Mbps - Megabits Per Second or Megabits Per Second
MHz - MegaHertz
MIPS - Million Instructions Per Second
MMX - Multi-Media Extensions
MSI - Micro Star International
N
NAS - Network Attached Storage
NAT - Network Address Translation
NEC - NEC Corporation
NIC - Network Interface Card
O
OC - Overclock (Over Clock)
OCZ - OCZ Technology
OEM - Original Equipment Manufacturer
P
PC - Personal Computer
PCB - Printed Circuit Board
PCI - Peripheral Component Interconnect
PDA - Personal Digital Assistant
PCMCIA - Peripheral Component Microchannel Interconnect Architecture
PGA - Professional Graphics Array
PLD - Programmable Logic Device
PM - Private Message / Private Messaging
PnP - Plug 'n Play
PNY - PNY Technology
POST - Power On Self Test
PPPoA - Point-to-Point Protocol over ATM
PPPoE - Point-to-Point Protocol over Ethernet
PQI - PQI Corporation
PSU - Power Supply Unit
R
RAID - Redundant Array of Inexpensive Disks
RAM - Random Access Memory
RAMDAC - Random Access Memory Digital Analog Convertor
RDRAM - Rambus Dynamic Random Access Memory
ROM - Read Only Memory
RPM - Revolutions Per Minute
S
SASID - Self-scanned Amorphous Silicon Integrated Display
SCA - SCSI Configured Automatically
SCSI - Small Computer System Interface
SDRAM - Synchronous Dynamic Random Access Memory
SECC - Single Edge Contact Connector
SODIMM - Small Outline Dual Inline Memory Module
SPARC - Scalable Processor ArChitecture
SOHO - Small Office Home Office
SRAM - Static Random Access Memory
SSE - Streaming SIMD Extensions
SVGA - Super Video Graphics Array
S/PDIF - Sony/Philips Digital Interface
T
TB - Terabytes
TBps - Terabytes per second
Tbps - Terabits per second
TDK - TDK Electronics
TEC - Thermoelectric Cooler
TPC - TipidPC
TWAIN - Technology Without An Important Name
U
UART - Universal Asynchronous Receiver/Transmitter
USB - Universal Serial Bus
UTP - Unshieled Twisted Pair
V
VCD - Video CD
VPN - Virtual Private Network
W
WAN - Wide Area Network
WTB - Want to Buy
WYSIWYG - What You See Is What You Get
X
XGA - Extended Graphics Array
XFX - XFX Graphics, a Division of Pine
XMS - Extended Memory Specification
XT - Extended Technology
Monday, December 13, 2010
Create One-Click Shutdown and Reboot Shortcuts
Create One-Click Shutdown and Reboot Shortcuts
>>> One-Click Shutdown Shortcut<<<<
1: First, create a shortcut on your desktop by right-clicking on the desktop, choosing New, and then choosing Shortcut.
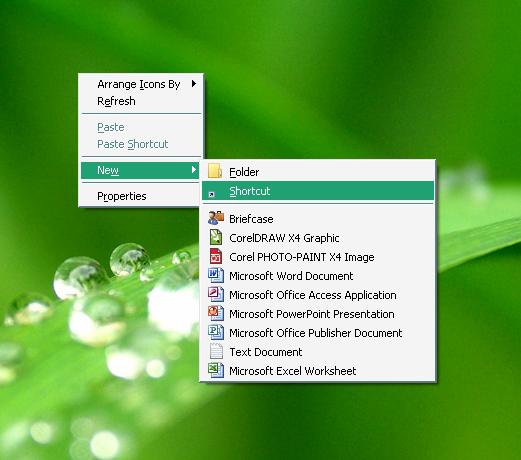
The Create Shortcut Wizard appears.
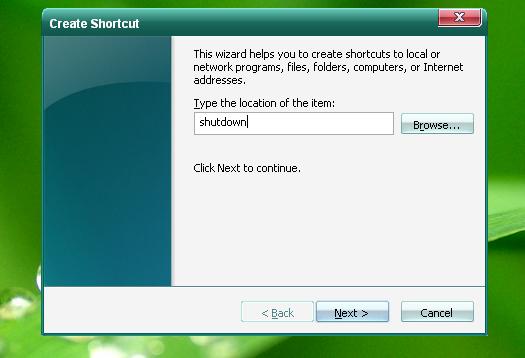
2: In the box asking for the location of the shortcut, type shutdown and press <Next>.
4: After you create the shortcut, double-clicking on it will shut down your PC.
>>> One-Click Restart Shortcut<<<<
1: First, create a shortcut on your desktop by right-clicking on the desktop, choosing New, and then choosing Shortcut. The Create Shortcut Wizard appears.
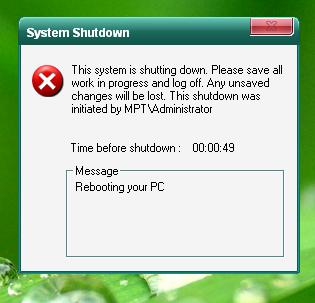
2: In the box asking for the location of the shortcut, type shutdown -r -t 50 -c "Rebooting your PC" and
press <Next>.
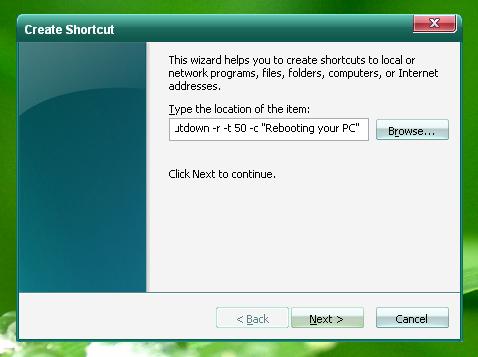
3: In the box asking for the name of shortcut, type any name for shortcut (e.g Restart) and press <Finish> to finish creating the shortcut.
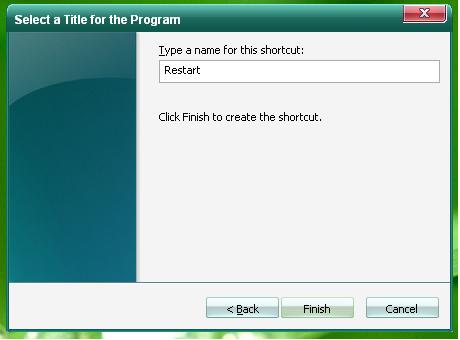
4: Double-clicking on that shortcut will reboot your
PC after a fifty-seconds delay and display the message
"Rebooting your PC."
But you can do much more with a shutdown shortcut than merely shut down your PC. You can add any combination of several switches to do extra duty, Table 1-3 lists all of them and describes their use.
Table 1-3
Switch
What it does
-s
Shuts down the PC.
-l
Logs off the current user.
-t nn
Indicates the duration of delay, in seconds, before performing the action.
-c "messagetext"
Displays a message in the System Shutdown window. A maximum of 127 characters can be used. The message must be enclosed in quotation marks.
-f
Forces any running applications to shut down.
-r
Reboots the PC.
Let us, give the shortcuts a real look by changing their icons.
1: First, right click on the shortcut and choose properties. The properties dialog appreas on tje shortcut tab press <Chang
Icon > button. If it says "The file%windir%/system32/shutdown.exe contains no icon.
Choose an icon from the list or specify a different
file.", Click Ok.
2: Now choose an appropriate icon for your shortcut and press <OK>. What I recommend looks like this:
>>> One-Click Shutdown Shortcut<<<<
1: First, create a shortcut on your desktop by right-clicking on the desktop, choosing New, and then choosing Shortcut.
The Create Shortcut Wizard appears.
2: In the box asking for the location of the shortcut, type shutdown and press <Next>.
4: After you create the shortcut, double-clicking on it will shut down your PC.
>>> One-Click Restart Shortcut<<<<
1: First, create a shortcut on your desktop by right-clicking on the desktop, choosing New, and then choosing Shortcut. The Create Shortcut Wizard appears.
2: In the box asking for the location of the shortcut, type shutdown -r -t 50 -c "Rebooting your PC" and
press <Next>.
3: In the box asking for the name of shortcut, type any name for shortcut (e.g Restart) and press <Finish> to finish creating the shortcut.
4: Double-clicking on that shortcut will reboot your
PC after a fifty-seconds delay and display the message
"Rebooting your PC."
But you can do much more with a shutdown shortcut than merely shut down your PC. You can add any combination of several switches to do extra duty, Table 1-3 lists all of them and describes their use.
Table 1-3
Switch
What it does
-s
Shuts down the PC.
-l
Logs off the current user.
-t nn
Indicates the duration of delay, in seconds, before performing the action.
-c "messagetext"
Displays a message in the System Shutdown window. A maximum of 127 characters can be used. The message must be enclosed in quotation marks.
-f
Forces any running applications to shut down.
-r
Reboots the PC.
Let us, give the shortcuts a real look by changing their icons.
1: First, right click on the shortcut and choose properties. The properties dialog appreas on tje shortcut tab press <Chang
Icon > button. If it says "The file%windir%/system32/shutdown.exe contains no icon.
Choose an icon from the list or specify a different
file.", Click Ok.
2: Now choose an appropriate icon for your shortcut and press <OK>. What I recommend looks like this:
How To assign/add an Icon To a Flash Drive/ Flash Memory
How To assign/add an Icon To a Flash Drive/ Flash Memory
Asalam-Mu-Alakaum, in today's tutorial i will show you how to assign/add an icon to a Flash Drive/ Flash Memory( Generally speaking, some people including me sometimes, not all the times, call it a "USB", isn't that so?,anyhow the Port in which Flash Drive is connected is known as USB (Universal Serial Bus) Port.
Step # 1: Pick an existing icon or create a new from scratch
a: Picking an existing icon is simple and easy. Your computer has a lot of icon but you don't know where are they located. To search for an icon file.
1: Click Start, and then click Search. (Windows Key+F)
2: Click All files and folders.
3: In box type *.ico
4: In Look in, click the drive C.
5: Click Search.
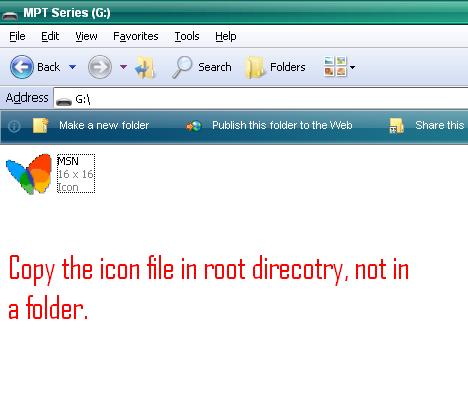
6: Choose any icon from the result as you desire (e.g MSN.ico) and copy it to the root directory of the Flash drive. Rename the icon to "myicon" and now jump to the step#2 after copying the icon into root directory.
(b): Creating a new icon from scratch
This sub-step is a bit difficult and time consuming but it depends on you how fast you can create an icon & which you will choose to create an icon. The one i use to create icons is from www.axialis.com. http://www.mediafire.com/?q9bbeye4bosoxcj Here are a few steps creating an icon at .
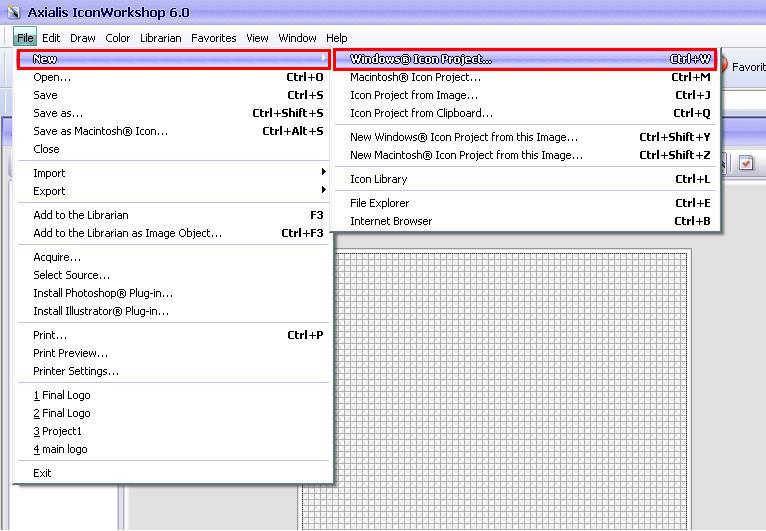
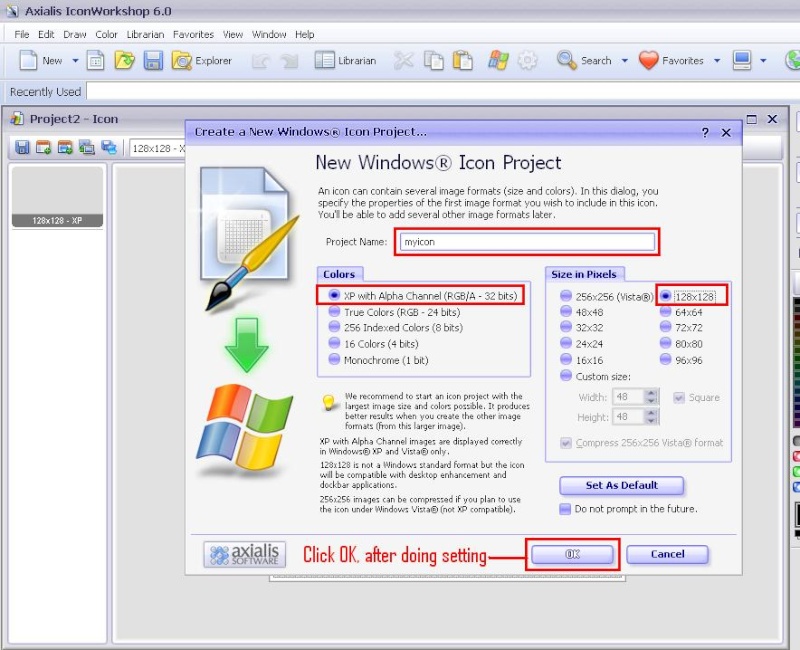
1: File Menu> New> Windows(R) Icon Project... (Ctrl+W). The new icon windows appear,go to next step to make some changes.
2: In the box type any text as you want (e.g myicon). In the frame, choose , in the choose <128 X 128> and Click OK
3: Design an icon using the tools and options available at most right side of the application or i recommend you to import an image for convenience, keeping reading to learn how to import an image and use it as icon.
4:File Menu>Import> Image (Ctrl+Shift+I). The import bitmap dialog appears, locate the image and click open. Click OK if any tip dialog appears. The image will be opened in a new window.
5: Edit Menu>Select All (Ctrl+A). Or manually create selection with mouse.
6: Edit >Copy(Ctrl+C). Switch (activate) the project you have just created with name myicon using windows menu.
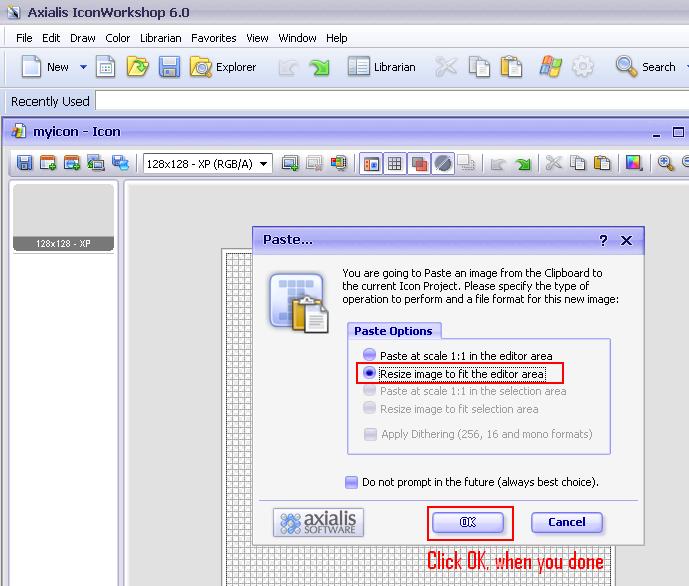
7: Edit>Paste (Ctrl+V). The paste dialog box appears, in paste options choose and click to size the image to the icon area.
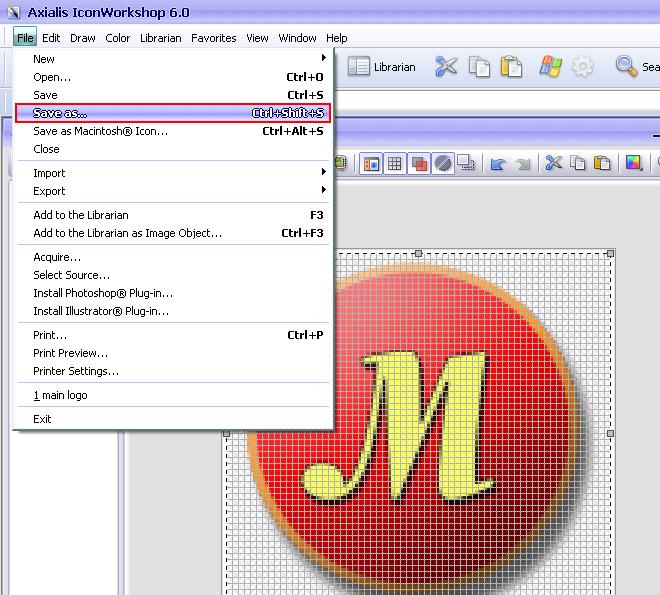
8: Now save the icon in the root director of your flash drive. Go to file menu and choose Save As. (Ctrl+Shift+S). The save as dialog appears locate the flash drive and save the myicon in the root directory.
Step # 2: Create a setup information file(.inf) using the notepad.
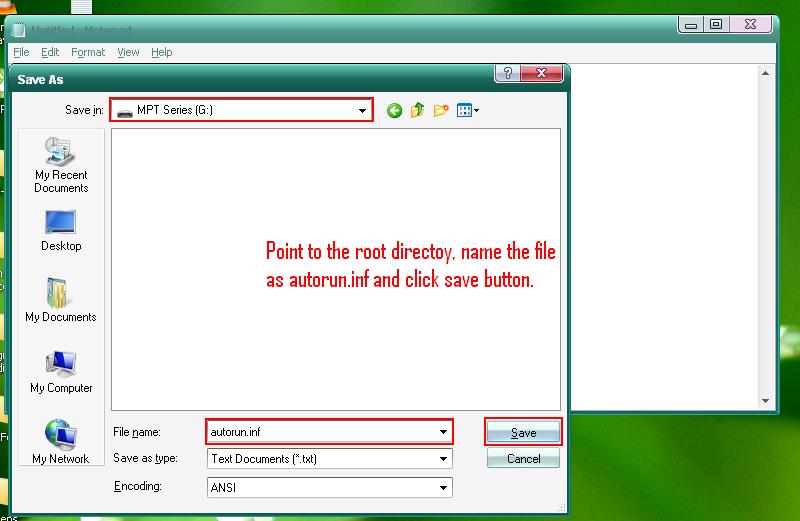
1: Open the plain notepad available in Start button>All programs>Accessories>Notepad and type the following. (only the first two lines.)
[autorun]
icon=myicon.ico
( myicon is the name of the icon we have saved in the root directory of the flash drive)
2: Save the file with name Autorun with extension .inf in the root directory of flash drive where you have saved the icon (myicon).
3: You are done!
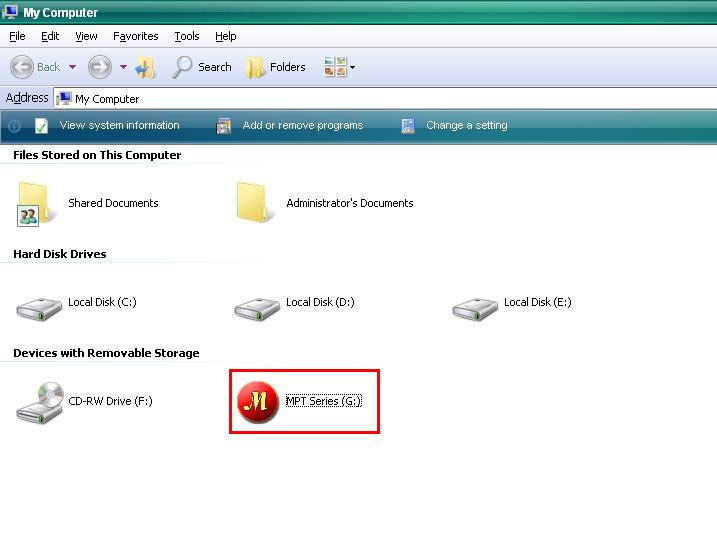
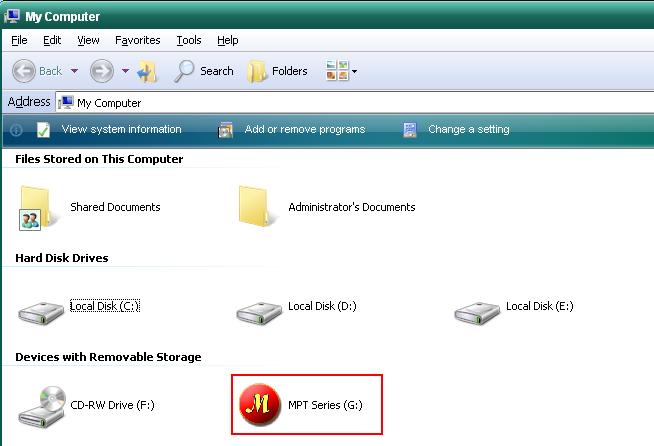
Step # 3: Verify the icon by exploring
1: From desktop double click on My Computer Icon, you will see the new icon for your flash drive. If you still don't see any icon, unplug the flash drive from the computer and re-plugging will give the chance to see your icon.
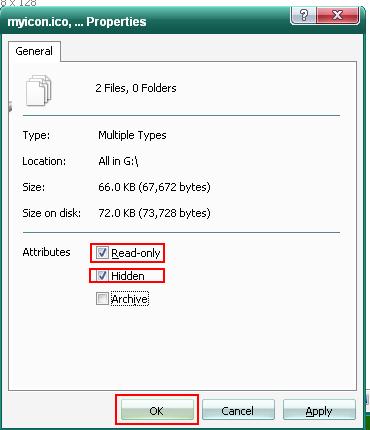
2: Make the icon and autorun.inf files hidden and read only, selecting both the files and right click with your mouse and choose properties. In the properties dialog check (turn on) the and attributes and click OK.
Warning: Deleting the icon & autorun.inf files and formatting the flash drive can cause the icon to disappear. Before formatting copy the icon & autorun to another location after you done the work re-copy them to the root directory of the flash drive.
Asalam-Mu-Alakaum, in today's tutorial i will show you how to assign/add an icon to a Flash Drive/ Flash Memory( Generally speaking, some people including me sometimes, not all the times, call it a "USB", isn't that so?,anyhow the Port in which Flash Drive is connected is known as USB (Universal Serial Bus) Port.
Step # 1: Pick an existing icon or create a new from scratch
a: Picking an existing icon is simple and easy. Your computer has a lot of icon but you don't know where are they located. To search for an icon file.
1: Click Start, and then click Search. (Windows Key+F)
2: Click All files and folders.
3: In box type *.ico
4: In Look in, click the drive C.
5: Click Search.
6: Choose any icon from the result as you desire (e.g MSN.ico) and copy it to the root directory of the Flash drive. Rename the icon to "myicon" and now jump to the step#2 after copying the icon into root directory.
(b): Creating a new icon from scratch
This sub-step is a bit difficult and time consuming but it depends on you how fast you can create an icon & which you will choose to create an icon. The one i use to create icons is from www.axialis.com. http://www.mediafire.com/?q9bbeye4bosoxcj Here are a few steps creating an icon at .
1: File Menu> New> Windows(R) Icon Project... (Ctrl+W). The new icon windows appear,go to next step to make some changes.
2: In the box type any text as you want (e.g myicon). In the frame, choose , in the choose <128 X 128> and Click OK
3: Design an icon using the tools and options available at most right side of the application or i recommend you to import an image for convenience, keeping reading to learn how to import an image and use it as icon.
4:File Menu>Import> Image (Ctrl+Shift+I). The import bitmap dialog appears, locate the image and click open. Click OK if any tip dialog appears. The image will be opened in a new window.
5: Edit Menu>Select All (Ctrl+A). Or manually create selection with mouse.
6: Edit >Copy(Ctrl+C). Switch (activate) the project you have just created with name myicon using windows menu.
7: Edit>Paste (Ctrl+V). The paste dialog box appears, in paste options choose and click to size the image to the icon area.
8: Now save the icon in the root director of your flash drive. Go to file menu and choose Save As. (Ctrl+Shift+S). The save as dialog appears locate the flash drive and save the myicon in the root directory.
Step # 2: Create a setup information file(.inf) using the notepad.
1: Open the plain notepad available in Start button>All programs>Accessories>Notepad and type the following. (only the first two lines.)
[autorun]
icon=myicon.ico
( myicon is the name of the icon we have saved in the root directory of the flash drive)
2: Save the file with name Autorun with extension .inf in the root directory of flash drive where you have saved the icon (myicon).
3: You are done!
Step # 3: Verify the icon by exploring
1: From desktop double click on My Computer Icon, you will see the new icon for your flash drive. If you still don't see any icon, unplug the flash drive from the computer and re-plugging will give the chance to see your icon.
2: Make the icon and autorun.inf files hidden and read only, selecting both the files and right click with your mouse and choose properties. In the properties dialog check (turn on) the and attributes and click OK.
Warning: Deleting the icon & autorun.inf files and formatting the flash drive can cause the icon to disappear. Before formatting copy the icon & autorun to another location after you done the work re-copy them to the root directory of the flash drive.
How to search Commands in Office 2007
Summary: In today's tutorial, i will give a search commands utility (add-in ) for searching your required command in Office 2007 Ribbon . It is very easy, just download install the necessary files and you will have a new search tab in each application of office, with help of which you can find your favorite command.
Introduction:
Do you think the previous office standard version(2003) has a clumsy interface of menus? I don't think so, because we had used that every time for documentation as result, all commands, their location and shortcut were absorbed in our memory but as Microsoft has developed a new interface we have to adopt anyhow a new user can take control of it but an existing user may be bored during migration from old interface to a new interface for that reason Microsoft has released a search commands utility. You need to install the Microsoft office 2007 before installing the search commands utility. During installation quite all office application.Do these steps in order to install the search utility.
Steps:
a: If you have not yet downloaded the search utility please download it now Download Here
b: Double click on the setup file or right click on it and choose from the shortcut menu.
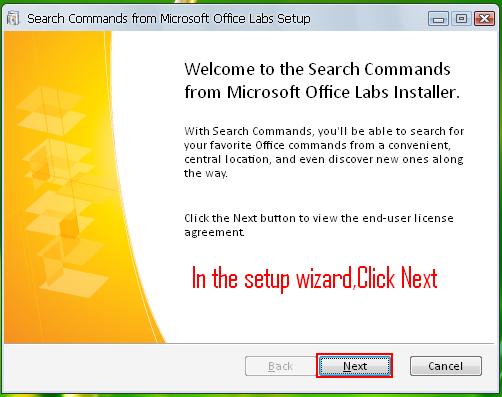
The setup wizard appears.
c: Click next in the setup wizard to precede.
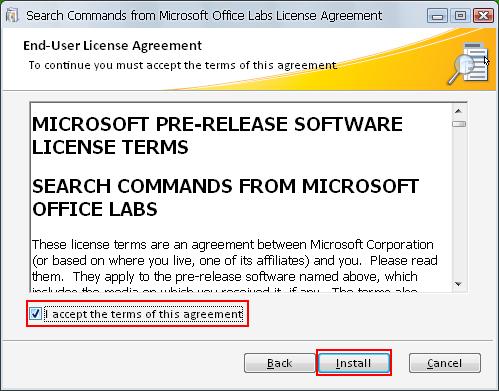
d: In the next screen Tick (ON) the option "I accept the terms of this agreement" and click install.
e: After completion of setup you will see a new search commands tab in the ribbon, click on it. Type your favorite command in the search box and click search button (icon). e.g. as shown in the fig:

Introduction:
Do you think the previous office standard version(2003) has a clumsy interface of menus? I don't think so, because we had used that every time for documentation as result, all commands, their location and shortcut were absorbed in our memory but as Microsoft has developed a new interface we have to adopt anyhow a new user can take control of it but an existing user may be bored during migration from old interface to a new interface for that reason Microsoft has released a search commands utility. You need to install the Microsoft office 2007 before installing the search commands utility. During installation quite all office application.Do these steps in order to install the search utility.
Steps:
a: If you have not yet downloaded the search utility please download it now Download Here
b: Double click on the setup file or right click on it and choose from the shortcut menu.
The setup wizard appears.
c: Click next in the setup wizard to precede.
d: In the next screen Tick (ON) the option "I accept the terms of this agreement" and click install.
e: After completion of setup you will see a new search commands tab in the ribbon, click on it. Type your favorite command in the search box and click search button (icon). e.g. as shown in the fig:
How to add a new location or an editor to Send To Menu
How to add a new location or an editor to Send To Menu
In this tutorial we will be talking about <Send To> folder, a folder where we can add a new location or favorite Editor and they will appear in the Send To Menu .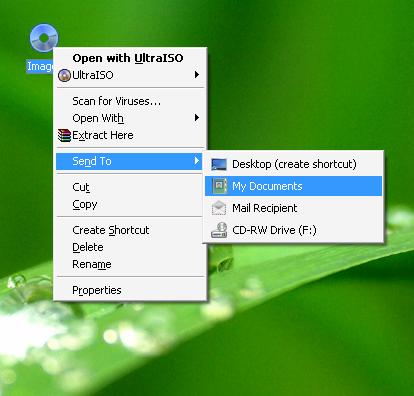
Many people use registry Editor to edit this menu but the drawback is, if you are newbie and a little thing goes wrong you can crash the windows. Adding a new location or your favorite editor to the <Send To> folder is much easier than edit a registry key. It is a time saving technique and more positive for me as I have been engaged in some new activities and can't reach to PF on time so I would prefer like to add a new location of PF, where i can send my tutorial direct, in-case we have to ask the permission from admin. Give it up, it seems to be impossible. Here we start.Firstly, you need to locate the <Send To> folder in your system.(don't be bothered that is in Local Disk (C:)).
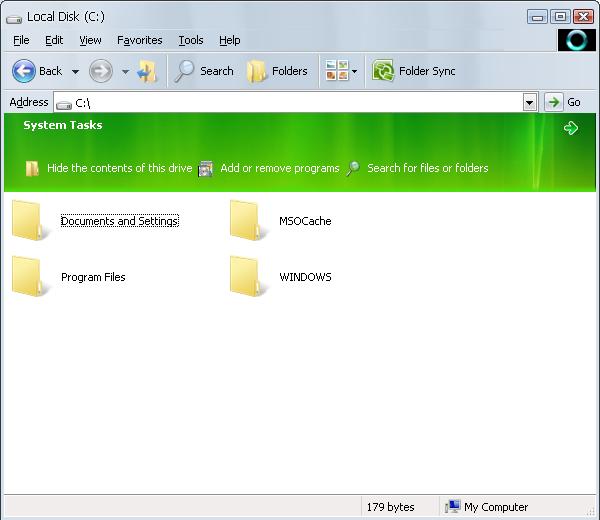
1:Double click on <My Computer> Icon to open it.
2:Open the <Local Disk (C:)> by double clicking on it or right click and choose <Open> from shortcut menu. In-case you have installed the operation system (windows) in other than drive C or you have multi operating systems, then locate the respective drive and open it.
3: Open the <Documents and Settings> folder.
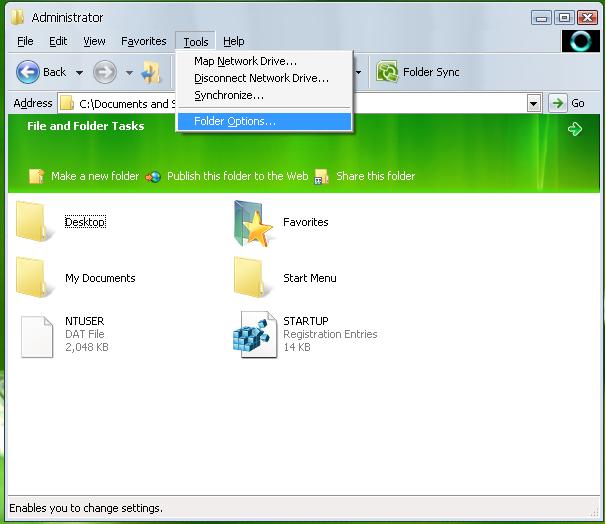
4:In the <Documents and Settings> folder, open the <Administrator> folder or your account name respective folder.
5:Now you have to locate the <Send To> folder in the administrator folder but remember that <Send To> folder is by-default set to be hidden. Follow these steps to show the hidden folder and files.
a: In the <Administrator> folder, click on the <Tools> menu and choose <Folder Option> from displayed menu. <Folder Options> dialog appears.
b: In the <View> tab, from <Hidden files and folder> choose <Show hidden files and folders>.
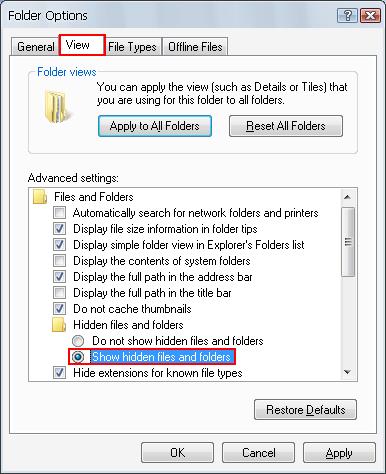
c: Click <Apply> and now <OK> button to close the dialog or direct <OK> to get two on one click.
d:Now you will see a lot of hidden folder but we are to work only on <Send To> folders. Double click, to open it.

6:Now it is time to add new locations and favorite Editor to <Send To> Menu.
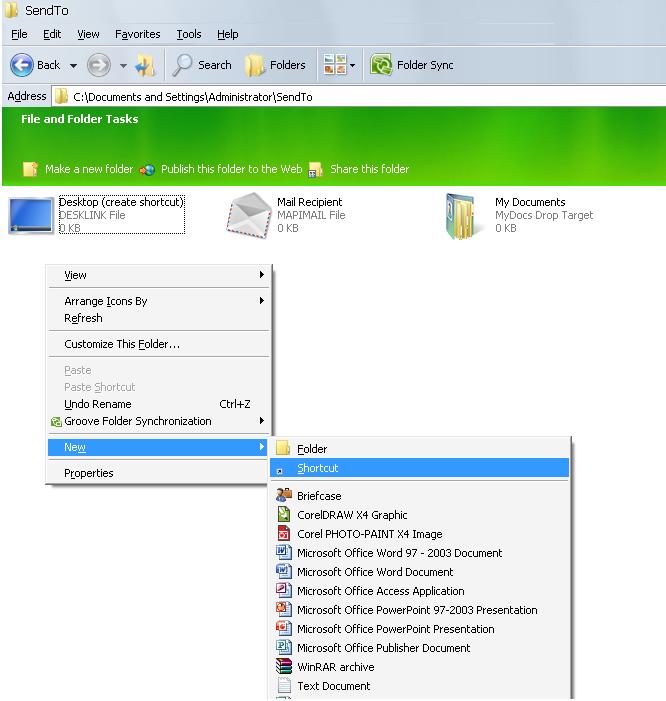
a: Right click on the empty area in the <Send To> folder, choose <New> then <Shortcut> from displayed menu.The shortcut wizard appears.
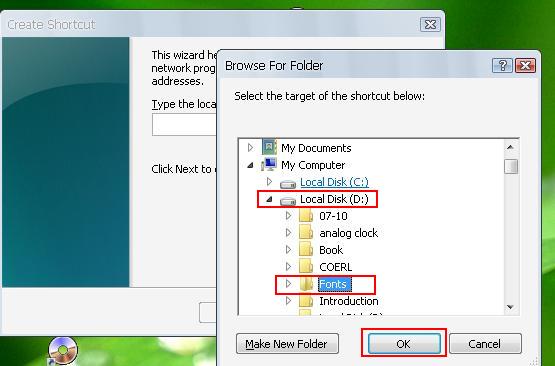
b: We will add a new location and an editor( you can add as many as you want). First we add a new location. In the shortcut wizard click <Browse> button and point to the location you want to add to the <Send To> Menu. For example we add a new location for <Font> folder from <Local Disk (D:)>. When you complete the process click <OK>.
c:Click <Next> button.
d:Now type the name for the shortcut (e.g. Best Fonts) and click <Finish> button.
e: To add an editor, Right click again, on the empty area in the <Send To> folder, choose <New> then <Shortcut> from displayed menu.The shortcut wizard appears.
f: We are going to add CorelDRAW as favorite editor.In the shortcut wizard click <Browse> button and point to the program location. For Corel Draw point to this location:
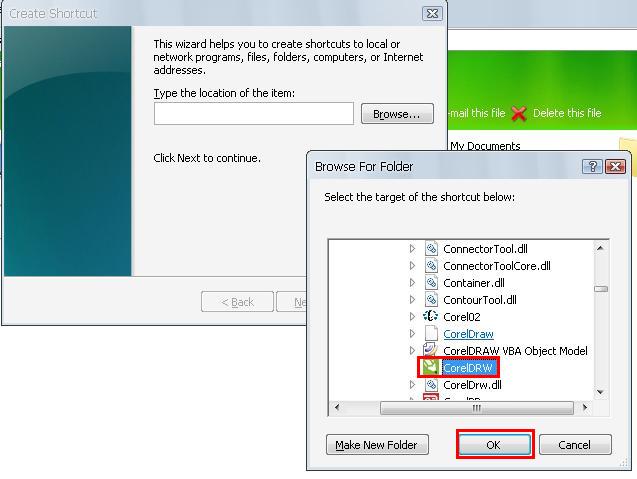
Local Disk (C:\)>Programs Files>Corel>CorelDRAW Graphics Suite X4>Draw>CorelDRW When you complete this process click <OK>.
g:Click <Next> button.
h:Now type the name for the shortcut (e.g. CorelDRAW) and click <Finish> button.
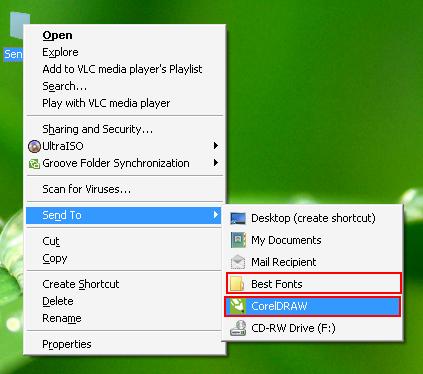
7:Now you can see and use the new location and your favorite editor in the <Send To> menu.
How to change the text (start) on the start button?
How to change the text (start) on the start button?
In this tutorial we will change the text (start) on the start button. These settings are aside in the specific files known as resource files. There are many third party software used to edit these types of files. I recommend the Resource Hacker as i have used it for more than changing start button text. Download it Here.You finish downloading the Resource Hacker, extract it from zip file and double "ResHacker.exe" to run the Resource Hacker. The tutorial mainly consists of two steps i.e. step # 1 and step #2. If you intent to practice the tutorial, in case you will need to adjust the performance of your computer. Here how to;Right Click on My Computer> Choose Properties. Go to Advance Tab and Click on Settings button. [/i]
On the visual Tab>Choose the second option "Adjust for best appearance" and Click OK.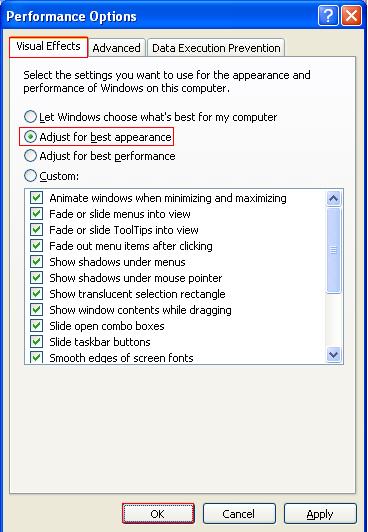 Step # 1:a: Open the Resource Hacker, by double click the ResHacker file.b: From the File menu choose Open command or CTRL+O.The "Open file containing resource.." dialog appears.
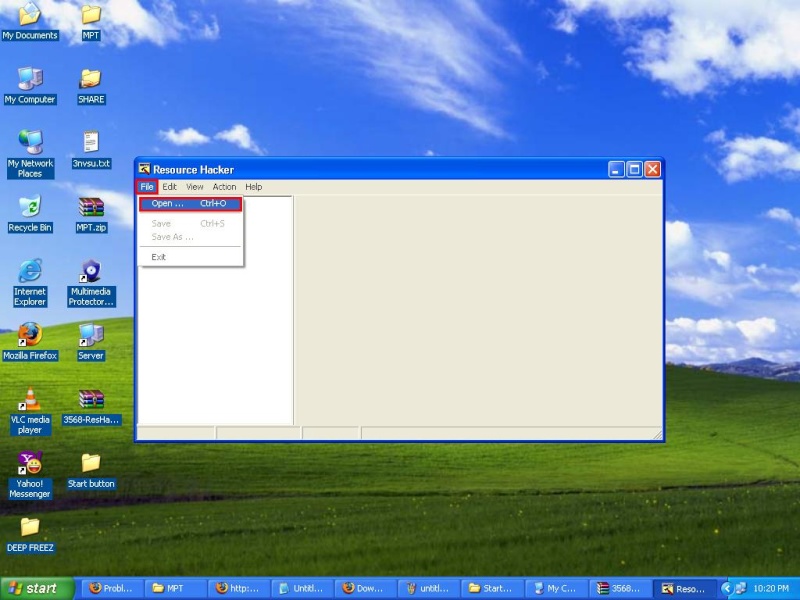
c: Local Disk (C:) and go to Windows folder. Now select the "explorer.exe" and click Open. If you have installed the windows in other than Local Disk (C:), then navigate to the respective drive and open the explorer.exe file from operating system folder.
d: Expand the "String Table" then "37" folder and now click "1033" item.
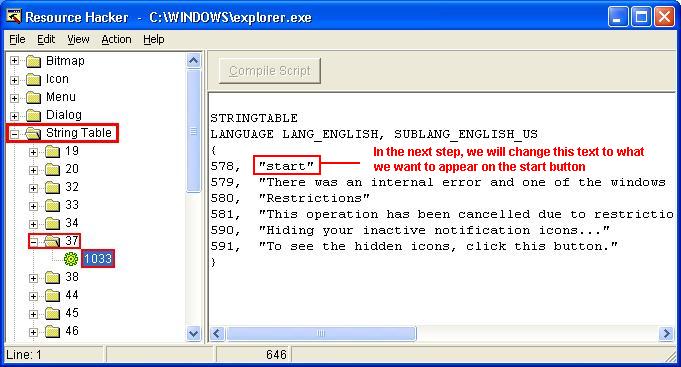
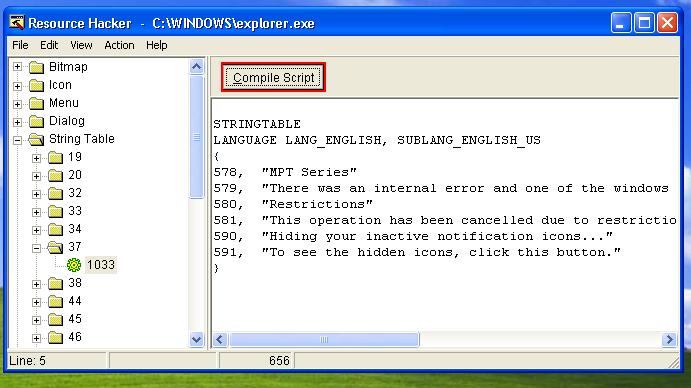
e: Change the text within quoation marks "start" as you desire the text to appear on the start button. Make sure to not remove the quotation marks, use only Letter (a-z) in upper or lower case or they maybe mixed but avoid special symbols and characters. You can use space for example, We change it to "MPT Series". There is no any character number limitation but long text like "Mansoor Pashto Training Series" on start button can occupy more space on the task bar and may look as strange.
f: Click on the Compile Script button.
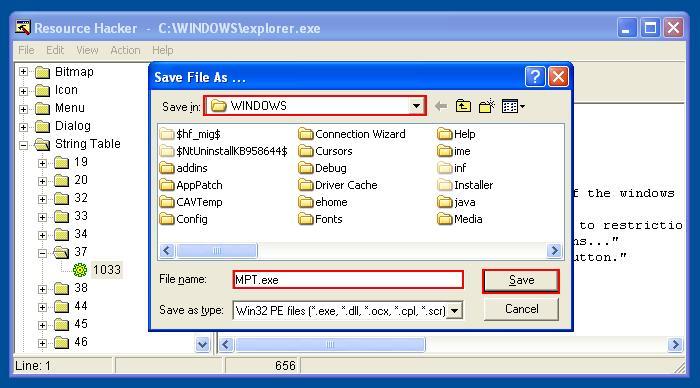
g: On the file Menu Click on Save As command, the Save as dialog appears.
h: Locate Local Disk (C:) and go to Windows folder. Now type the file name anything you want, avoid the space or other symbols and make sure to put the extension (.exe) at end of the file name. e.g MPT.exe and click the Save button.
i: Exit the Resource Hacker.
Step # 2:
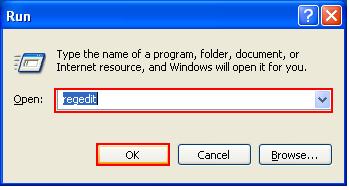
a: Go to Run Command (Windows + R),type regedit and click OK button. The registry editor appears.
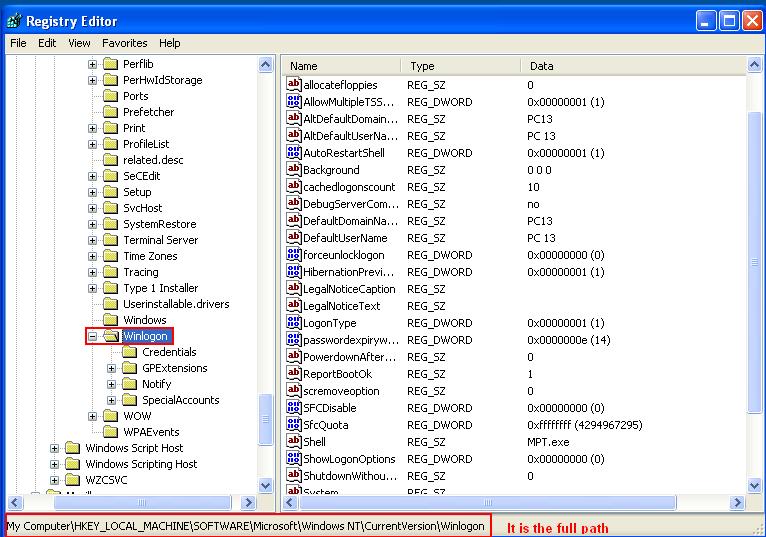
b: Expand the key HKEY_LOCAL_MACHINE>SOFTWARE>Microsoft>Windows NT>CurrentVersion>Winlogon. The full key looks likeMy Computer\HKEY_LOCAL_MACHINE\SOFTWARE\Microsoft\Windwos NT\CurrentVersion\Winlogon
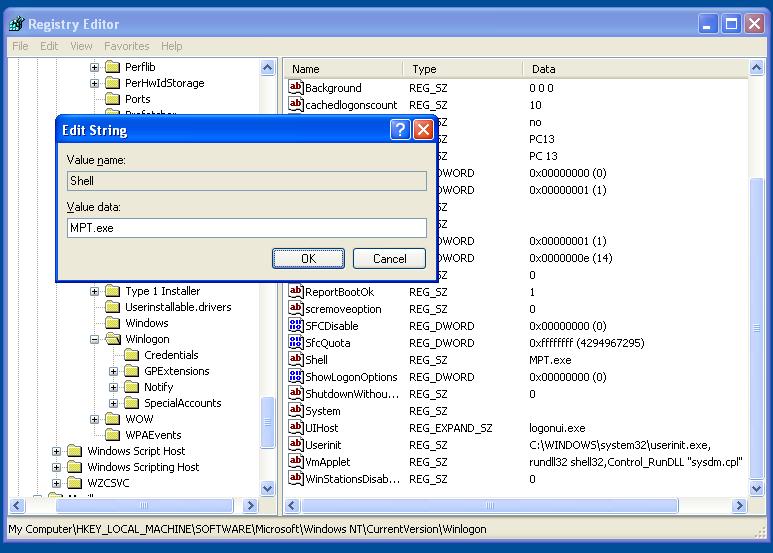
c: In Winlogon Open the Shell key.
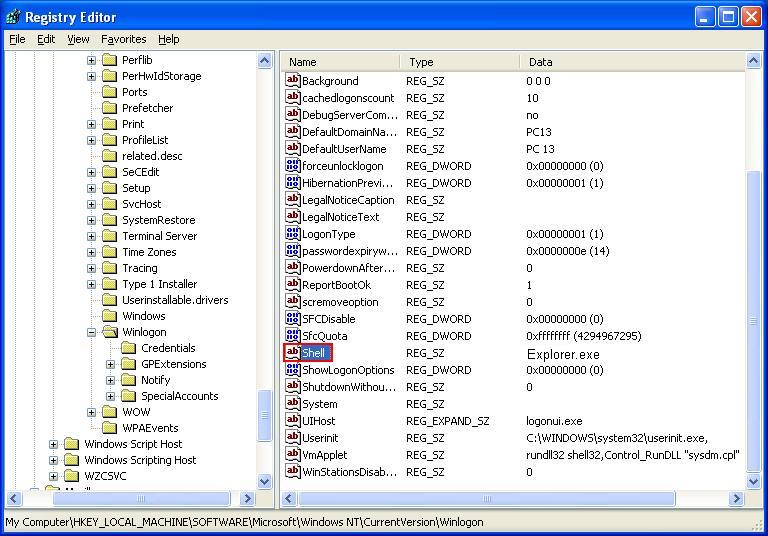
d: Rename the Explorer.exe to the file name you have Save As in the step-h of step # 1, e.g MPT.exe and Click OK button. Remember to aslo type the extension .exe(Don't worry if you Windows version say explorer.exe, it is OK just rename it)
e: Exit Registory Editor, Log Off and again Log On or Restart your Computer.
f: After doing step e: the text on the start button will be changed according to the file specified in the registry editor.WARNING: May you have noted the procedure is very easy but is not risk-less. Make sure to edit the correct explorer.exe and the correct key in the registry editor.If something goes wrong name the shell back to Explorer.exe (or explorer.exe)

Step # 1:a: Open the Resource Hacker, by double click the ResHacker file.b: From the File menu choose Open command or CTRL+O.The "Open file containing resource.." dialog appears. c: Local Disk (C:) and go to Windows folder. Now select the "explorer.exe" and click Open. If you have installed the windows in other than Local Disk (C:), then navigate to the respective drive and open the explorer.exe file from operating system folder.
d: Expand the "String Table" then "37" folder and now click "1033" item.
e: Change the text within quoation marks "start" as you desire the text to appear on the start button. Make sure to not remove the quotation marks, use only Letter (a-z) in upper or lower case or they maybe mixed but avoid special symbols and characters. You can use space for example, We change it to "MPT Series". There is no any character number limitation but long text like "Mansoor Pashto Training Series" on start button can occupy more space on the task bar and may look as strange.
f: Click on the Compile Script button.
g: On the file Menu Click on Save As command, the Save as dialog appears.
h: Locate Local Disk (C:) and go to Windows folder. Now type the file name anything you want, avoid the space or other symbols and make sure to put the extension (.exe) at end of the file name. e.g MPT.exe and click the Save button.
i: Exit the Resource Hacker.
Step # 2:
a: Go to Run Command (Windows + R),type regedit and click OK button. The registry editor appears.
b: Expand the key HKEY_LOCAL_MACHINE>SOFTWARE>Microsoft>Windows NT>CurrentVersion>Winlogon. The full key looks likeMy Computer\HKEY_LOCAL_MACHINE\SOFTWARE\Microsoft\Windwos NT\CurrentVersion\Winlogon
c: In Winlogon Open the Shell key.
d: Rename the Explorer.exe to the file name you have Save As in the step-h of step # 1, e.g MPT.exe and Click OK button. Remember to aslo type the extension .exe(Don't worry if you Windows version say explorer.exe, it is OK just rename it)
e: Exit Registory Editor, Log Off and again Log On or Restart your Computer.
f: After doing step e: the text on the start button will be changed according to the file specified in the registry editor.WARNING: May you have noted the procedure is very easy but is not risk-less. Make sure to edit the correct explorer.exe and the correct key in the registry editor.If something goes wrong name the shell back to Explorer.exe (or explorer.exe)
Subscribe to:
Comments (Atom)
Popular Posts
-
 Note: Print out this drill and use any word processing application to practice the drill. For better result do the practice three or four t...
 -
 Note: Print out this drill and use any word processing application to practice the drill. For better result do the practice three or four ...
 -
 How to rename the recycle bin ? Salam! Isn't cool to change Recyble Bin to Trash, dust bin or something else you desire? If yes then it...